
Resin coatings are great. They protect and beautify floors. Plus, they are durable when done right. We're talking about seamless, stain-resistant surfaces that can handle a lot of wear. They are perfect for homes and businesses here in Denver. But things can go wrong. Coatings can crack, peel, bubble, or not cure right.
That's why knowing how to apply them right matters. We're talking about mixing the resin and hardener in the right amounts. Even a little off can cause problems. Then, there's the application. Rolling, self-leveling—each way has its tricks. You've got to get the thickness right—not too thin, not too thick. And curing times matter. You rush it, and you'll end up with a soft, sticky mess.
Different surfaces need different plans. Concrete? Wood? Metal? Each needs specific prep work and application. Trying to find a reliable Flooring Contractor in Denver residents depend on for new flooring projects.. It's not hard, but it does take knowledge and care. Getting it wrong? You're looking at a floor that's ugly and won't last. That means redoing it, which nobody wants. So, let's see how to avoid these problems and get your resin coating done right the first time.
Let's examine what can go wrong with resin coatings. Blistering can occur, where the coating lifts in spots. Delamination is similar, but larger areas peel away. Cracking usually comes from stress or using the wrong resin.
Discoloration is another common problem, often from UV exposure or chemical reactions. Bubbling happens when air gets trapped during application. "Orange peel" looks like a bumpy surface. Fish eyes are small imperfections, usually from contaminants on the surface.
Solvent entrapment happens when the solvent doesn't fully evaporate during curing, which creates a soft coating. Amine blush is a sticky film that forms on the surface, especially in humid conditions. Wearing happens as the coating thins over time.
How do you figure out the problem? Look closely. Is it a surface issue, or is it deeper? Check the environment. Was it humid or too hot/cold? Think about the application. Was the surface prepped right? Was the resin mixed right? Knowing what to look for helps a lot.
Good surface prep matters. If you skip steps, the resin won't bond. You must clean the surface well to remove dirt, oil, or old coatings. Grinding the concrete is often needed to create a strong bond. In Denver, temperature changes can cause concrete to expand, so a good bond prevents cracking.
Incorrect mixing is a common error. Resin coatings often use two parts, and the resin-to-hardener ratio must be exact. Too much or too little hardener can change the curing, leading to a soft or brittle finish. Follow the instructions and use good measuring tools. Even a small change can affect the result, especially with Denver's dry air.
The environment matters a lot. Temperature and humidity can change how resin coatings cure. Most resins need a certain temperature to work. High humidity can hurt the curing, causing clouding or a weak bond. Denver's weather can be hard to predict, with hot summers and cold winters. Pick a resin that works for the local weather, and check the forecast before you start.
Bad application can ruin a coating. This includes applying the resin too thin or thick, or using the wrong methods. Air bubbles can also get stuck in the resin if you don't apply it right. Use the correct tools, like squeegees and rollers, and apply the resin evenly. Practice helps, so test a small area first.
Picking the wrong resin can be a problem. Different resins have different uses. For example, epoxy resins are strong, but they don't resist UV light. So, they don't work well outside. Polyurethane resins resist UV light better, but they aren't as strong as epoxies. Think about what your project needs and pick a resin that fits the environment and traffic. Denver's strong sunlight means UV resistance is key for outside projects.
Good surface preparation matters for a resin coating, especially in a place like Denver with its mix of buildings and weather. Think of it like painting. The paint won't stick if the wall is dirty, correct? The same is true here.
First, clean the surface. Remove any dirt, oil, grease, or old coatings. Then grind or profile. This step creates a rough surface, so the resin can grab on. Different surfaces need different methods. Concrete often needs diamond grinding. Wood might need sanding. Metal could need sandblasting.
Moisture testing matters, especially with concrete. If there's too much moisture, the resin won't bond, and you'll get bubbles or peeling. Crack repair is another must-do. Fill any cracks with an epoxy filler before applying the coating. If not, those cracks will show through the new surface.
For concrete, you might need to acid etch it to open the pores. Wood needs to be sealed to keep moisture out. Metal needs a rust-inhibiting primer. Skipping steps invites trouble, and a failed resin coating is a pain to fix. The upfront work pays off.
Resin curing is a chemical process that is sensitive to temperature and humidity. Deviations from the recommended curing parameters can result in incomplete hardening, surface tackiness, or excessive brittleness. Maintaining optimal environmental conditions during the curing phase is essential for achieving the desired mechanical properties and longevity of the resin coating.
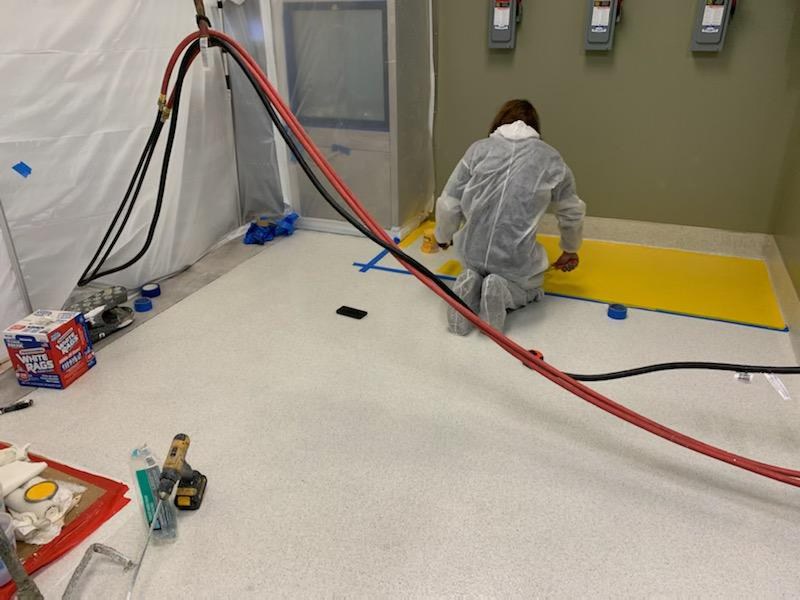
Achieving a flawless resin coating requires meticulous attention to detail during the application process. Unevenness can arise from inconsistent pouring techniques, variations in substrate absorption, or inadequate mixing of the resin components. This results in unsightly patches, compromised structural integrity, and an unprofessional final appearance.
The presence of dust, oil, or other contaminants on the substrate before resin application can severely impact adhesion. These impurities create a barrier between the resin and the surface, leading to peeling, blistering, or clouding. Thorough surface preparation, including cleaning and degreasing, is crucial for a strong and durable bond.
Let's discuss how to apply the resin coating to the floor. Things can go wrong if you aren't careful.
First, measure and mix the resin components as the manufacturer directs. Don't estimate. Use measuring cups or scales to be precise. Too much or too little hardener can cause a coating that won't cure right, or it will be brittle or sticky.
Now, let's talk about application. Pouring works for self-leveling coatings because it spreads. Brushing suits smaller areas or detail work. Rolling works on larger, flat surfaces. Spraying is for pros because it needs special equipment and works best for thin, even coats.
Whatever method you choose, follow the manufacturer's directions on coating thickness. If it's too thin, it won't protect the floor. If it's too thick, you risk bubbles, uneven curing, and other issues.
Here is why temperature matters, especially in Denver: Resin coatings react to temperature. If it's too cold, the resin won't flow or cure right. If it's too hot, it can cure too fast and cause problems. Check the product label for the recommended temperature range, and keep your workspace in that range. You might need heaters or fans.
Next steps: Understand the curing schedule. Don't walk on it too soon. Let it cure fully, or you'll leave footprints and cause damage.
Let's discuss getting these resin coatings right. It starts with picking the right resin. You have a few main choices: epoxy, polyurethane, polyaspartic, and acrylic. Each has strengths, and Denver's climate plays a role.
Epoxy is tough. It's great for garages or commercial spaces where you need serious chemical resistance. It can yellow over time with UV exposure, so it might not be the best choice for a sun-drenched patio.
Polyurethane is more flexible, which means it handles temperature swings better. Think about Denver's weather: hot summers and freezing winters. Polyurethane is a good choice for outdoor applications or places where you need some give.
Polyaspartic is a newer option. It cures fast. That's great if you need to get a floor back in service quickly. It's also UV resistant, but it can cost more.
Acrylics are more budget-friendly and easier to apply, but they might not hold up to heavy traffic or harsh chemicals like the others. They work for lighter-duty residential applications, like a basement floor.
How do you decide? Think about how the floor will be used. How much traffic will it see? Will it be exposed to chemicals or sunlight? What's your budget? Answering these questions will guide you toward the right resin for your Denver project. Don't just grab the least expensive option because you'll regret it.
When you apply resin coatings, especially in Denver, consider the weather. Temperature, humidity, and airflow affect how well the coating sets. If it's too cold, the resin might not flow right. If it's too humid, you could get a cloudy or sticky finish. If there is too much airflow, dust and debris can get into the wet resin.
You want the temperature within the manufacturer's range, often 65–75°F. Humidity should be below 70%, but check your product's guidelines. To manage this, use heaters or air conditioners to get the space right. Dehumidifiers are helpful. Ensure good ventilation without creating a wind tunnel.
Here is why this matters: you might see bubbles, cracks, or inconsistent curing. It can ruin the job. So, before you open the resin, watch the weather and plan. It’s worth the effort to get it right.
Resin Flooring: Checklist for Long-Term Durability and Adhesion
Want your resin floor to last? Regular cleaning is key. Sweep or vacuum to remove grit that can scratch the surface. Mop with a mild detergent. Harsh chemicals can dull or damage the coating.
Next, do inspections. Look for cracks, chips, or discoloration, especially where there is lots of foot traffic. Spotting small issues early can prevent bigger repairs later.
If you find damage, don't worry. You can often fix small chips with a resin repair kit. Clean the area, apply the compound, and let it cure. For larger cracks, get professional help.
Warranties matter. Read the fine print to know what's covered and for how long. Also, think about professional maintenance. A flooring contractor can do a deep clean, reseal the surface, and spot problems. This costs money, but it can extend the life of your floor and save you money. Plus, you get peace of mind.
You have a small resin coating problem? Don't panic. You can fix most minor issues. Say you have a scratch from moving furniture. First, clean the area well because dirt will ruin the repair. Then, lightly sand the scratch, so the new resin can grip.
For small scratches, a thin coat of the original resin often works. Mix it *exactly* as directed. Temperature matters! If it is too cold, it won't cure right. If it is too hot, it might cure too fast. Use a small brush to carefully apply the resin to the scratch, keeping it level with the surface.
For a bigger chip, fill it first. You can buy epoxy fillers at hardware stores. Let the filler cure, then sand it smooth before adding the resin topcoat.
Discoloration is harder. Sometimes it is surface dirt, so try a mild detergent. If that doesn't work, UV exposure might be the cause. If so, lightly sand the area and add a fresh coat of resin with a UV protectant. First, test a small area to ensure the new resin matches. Also, ventilation matters! Open some windows because you don't want to breathe these chemicals all day.
Let's examine real-world examples of how resin coatings changed spaces in Denver. We've witnessed great results in homes, businesses, and industrial locations.
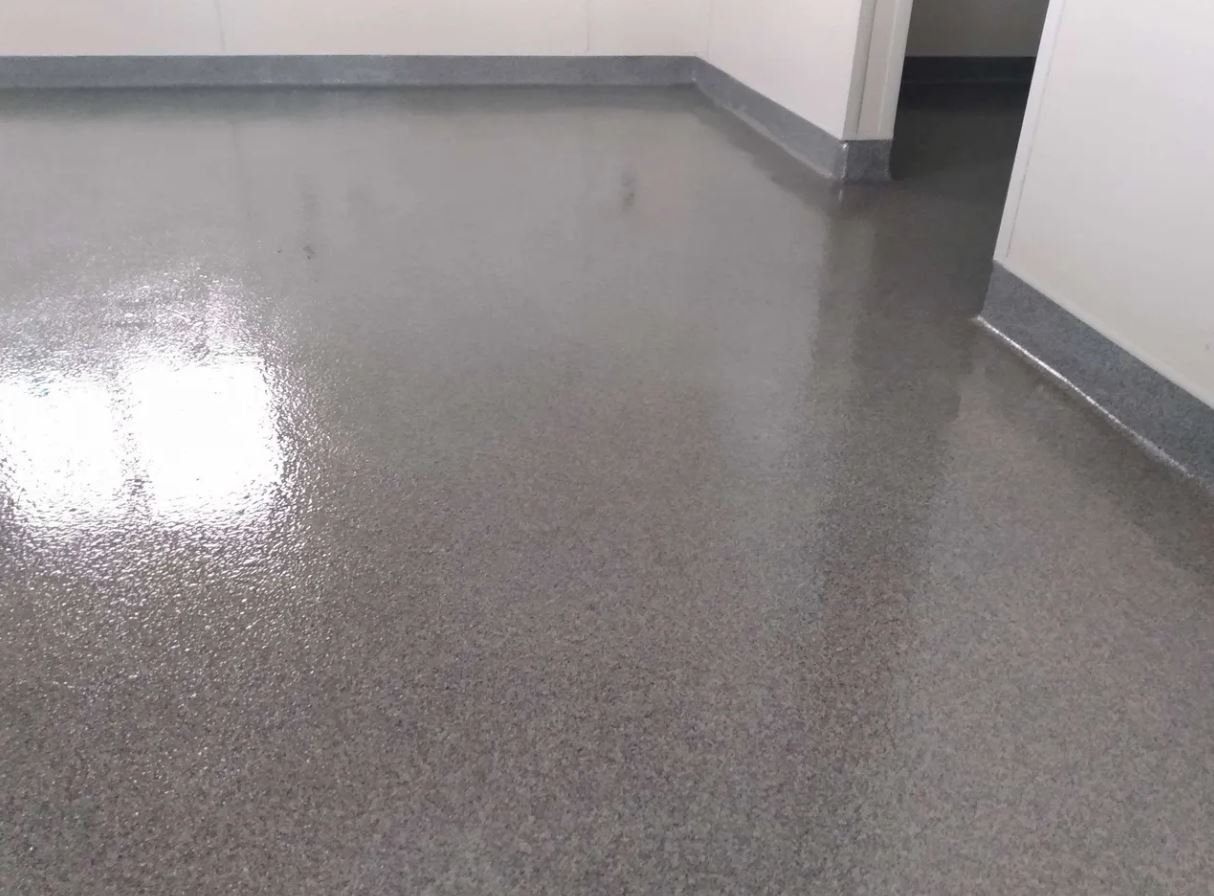
In a home project in Cherry Creek, we changed a cracked, stained concrete basement floor into a smooth, attractive surface with a metallic epoxy coating. The homeowner loved it. The coating completely changed the feel of the space, making it brighter and more usable. (Before-and-after photos here!) She even said, "I can't believe it's the same basement! It's so easy to clean now, and it looks fantastic."
Next, a restaurant downtown needed a strong, slip-resistant floor for their kitchen. We used a polyurethane system known for its chemical resistance and long life. The result? A safer, cleaner workspace for their staff. Correct application matters here. You must mix the materials correctly and follow the curing schedule closely, or you'll have a sticky mess.
Industrial locations also gain a lot. Think warehouses or manufacturing plants. We did a project in Aurora where we put in an epoxy floor with great abrasion resistance. Before, the concrete floor was always chipping and creating dust. Now, it's a smooth, strong surface that can handle heavy machinery and constant foot traffic.
Correct application and regular upkeep help these coatings last. A good cleaning plan and quick repairs of any damage will make your resin floor last longer. It's an investment that pays off over time by preventing costly repairs or replacements later.
When do you need a pro for resin coatings? If you're working on more than a simple garage floor, it's likely a good idea. Complex projects, like commercial spaces or detailed designs, are best left to experienced contractors. You might think you can do it yourself, but a bad self-leveling job or uneven thickness can cause problems.
Why choose a pro? They have the experience to work with different surfaces, understand curing times, and make sure you get that smooth, stain-resistant finish you want. Also, they can customize the coating to your needs, whether it's for heavy foot traffic in a store or chemical resistance in a lab.
If you're in Denver, here's a quick list for choosing the right contractor:
Hiring the right contractor might cost more at first, but it can save you trouble and money later. Think of it as money spent on a strong, nice floor that will last.
When you apply resin, some things matter a lot. Mixing must be perfect. Follow the maker's directions exactly, or it will be a mess. Rolling matters too. Aim for even coverage, without thin spots or puddles. Self-leveling resins help, mostly on big surfaces, but you still have to guide them.
Thickness is also key. If it is too thin, it will not hold up. If it is too thick, it might not cure right, or it could crack later. When curing, stick to the schedule. Do not rush. Temperature and humidity matter, so watch them.
If you do this right, you get a floor that looks great and can handle a lot of wear, whether in your house or a busy store. A good resin coating resists stains, is easy to clean, and lasts years. If you mess it up, expect peeling, cracking, and wasted money.
Planning, careful work, and upkeep are key. It pays off over time, both in looks and floor life. If you are in Denver and need help or have questions, contact us. We can offer advice or services to make your resin coating project a win. We want you to get the best value.